Settings |
  
|
Settings |
|
In the settings manager page the user can create the platform with different resolutions and orientations. The Platform that was set here will be appearing in page editor where the user can select them to set the alignments of the UI parts in the pages as per the resolution. The user can also add a new platform or can edit the existing one.
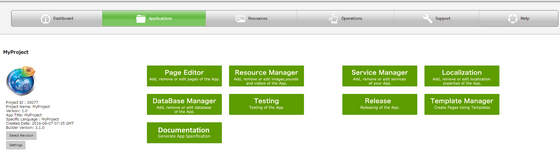
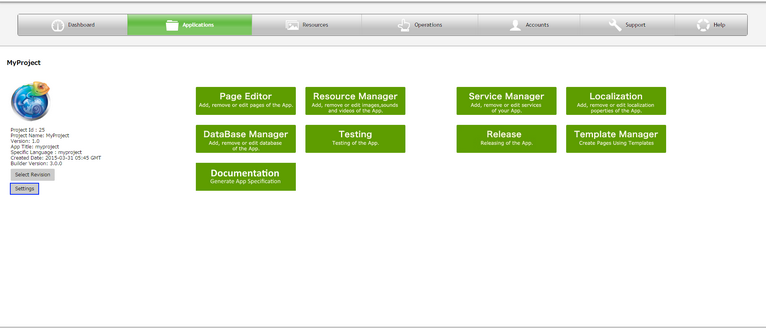
Note: For Adding or Editing Settings user needs to click on the "Settings" button on the Application Manager page as below
1. New Project Platform Settings
Step 1: Create a new project.The user is redirected to the settings page as below for Platform settings. Click here to know how to create and edit project.
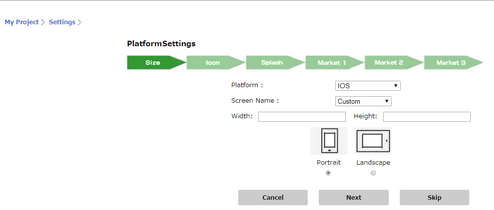
Step 2: Set the "Size" parameters as below and click "Next".

Parameter |
Description |
Platform: |
Select the platform type iOS, Android, Mobile web and windows from the platform drop down list. |
Screen Name: |
Screen name displays the names of the devices as per the platform selected. If the user is creating a new platform for Samsung S3 galaxy device then the user can select Platform as Android, Screen name as Samsung S3 from the dropdown.
|
Width: |
User can enter Custom width for the desired resolution of the device selected . For example if the user selects platform for Samsung Galaxy S3 device which is having a resolution 720X1280, the width will be 720. |
Height: |
User can enter Custom height for the desired resolution of the device selected . For example if the user selects platform for Samsung Galaxy S3 device which is having a resolution 720X1280, the height will be 1280. |
Portrait/Landscape: |
Select either the portrait or landscape orientation by clicking on the portrait or landscape buttons. |
Step 3: "Icon" settings window opens . Click on "Choose file" button to select the icon image from the local system. Application icon is the icon image of the application. The icon is displayed once the App is installed on the device.
![]()
Please note that:
1. Select image file of 72*72px for Low Resolution, 114*114px for High Resolution.
2. The supported Image file format* is "png" only.
* Those formats which are converted from other image formats (like jpeg, jpg, gif etc) to png are not supported.
3. For Android: Image Name should be a-z 0-9 eg alpha1.png.
Other Image Names like
a)icon.png (default android icon filename)
b)Upper case on filename and ext. name. eg ALPHA. PNG
c)Numeric filename e.g 123.png
d)Other characters aside from a-b 0-9 like @lph!.png
e)CJK (Chinese, Japanese and Korean) characters
are not supported.
Note: An error message is displayed if image file type is not supported.
Step 4: File selected is displayed as below for e.g "image.png". Click "Next".

Step 5: "Splash" Icon settings open. Click on "Choose file" button to select the Splash icon image from the local system. Splash image is displayed when the application is launched.
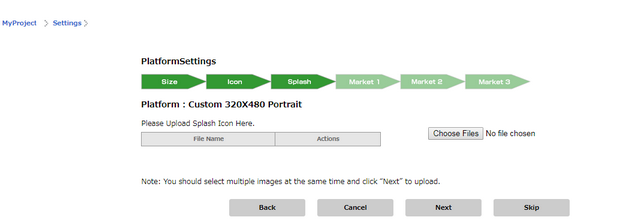
Please note that:
1. Select image file of 640*960px for Low Resolution, 780*1004px for High Resolution.
2. The supported Image file format* is "png" only.
* Those formats which are converted from other image formats (like jpeg, jpg, gif etc) to png are not supported.
3. For Android: Image Name should be a-z 0-9 eg alpha1.png.
Other Image Names like
f)icon.png (default android icon filename)
g)Upper case on filename and ext. name. eg ALPHA. PNG
h)Numeric filename e.g 123.png
i)Other characters aside from a-b 0-9 like @lph!.png
j)CJK (Chinese, Japanese and Korean) characters
are not supported.
Note:
1) An error message is displayed if image file type is not supported.
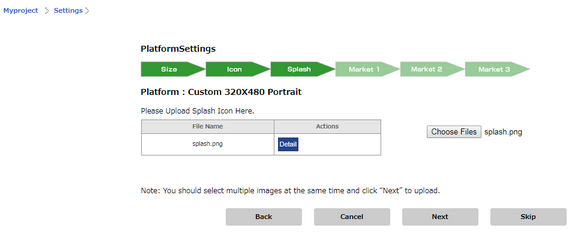
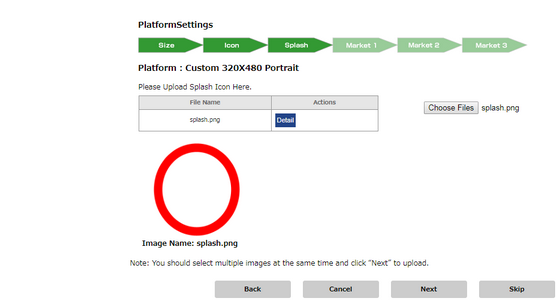
Step 6: File selected is displayed as below for e.g "splashimage.png". User can click on Detail to see the splash icon as shown in second image below. Click "Next".
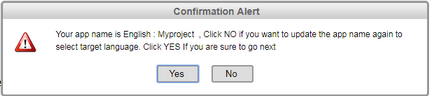
Step 7: When the user clicks on the next button the page gets redirected to the "Market1" page, where the user can choose to provide the market details and click next or skip the step by clicking on "skip" button below and fill the details later. An alert will pop up as shown in second image below for selecting target language for App name, click on Yes to proceed.
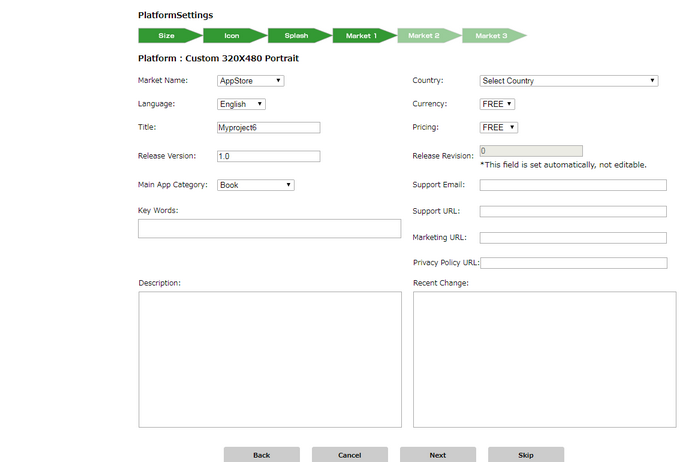
Some of the fields descriptions are mentioned below:-
Fields |
Description |
key words |
Please enter one or more keywords that describe your app. Keywords are used to help customers search the App Store effectively. Your app will be search-able by app name, company name, and keywords. |
Description |
Please enter the description of the App that will be displayed in the Apple/Play Store. i.e. describe the app in detail. |
Support Email |
Enter the support Email you plan to provide for users having questions regarding the app. |
Support URL |
Enter the support URL which is the contact information with which users can contact you regarding app issues, general feedback, and feature enhancement requests. |
Marketing URL |
Enter Marketing URL. |
Privacy policy URL |
Enter Privacy Policy URL. |
Recent changes |
Please enter recent changes to the App. For example: New features, new contents, etc. |
Step 8: Fill in all the fields in the "Market2" or the user can skip the page from filling. Click on the next button.
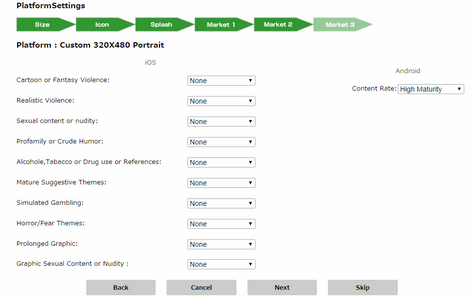
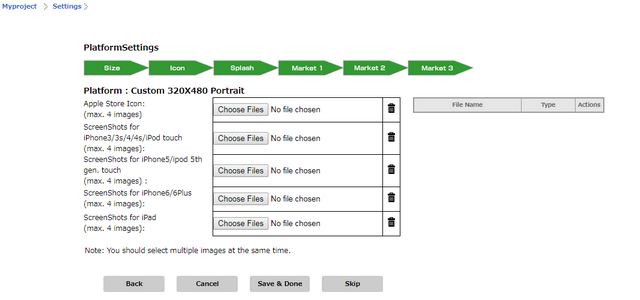
Step 9: "Market 3" settings window appear. Click on the boxes on the right side to add images or user can skip uploading the images. Click on the Done button.
Step 10: When the user clicks on the done button the page will be redirected to the settings manager page and the user can see the added platform in the list of platform table.

Below table describes the functionality of all the buttons of above window:
Buttons |
Description |
Edit App Type |
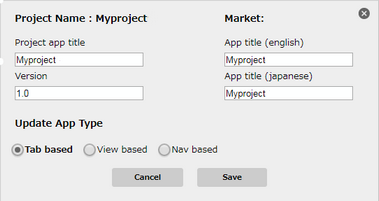
Opens an OverLay where user can select the App Type as "Nav" based, "Tab" based, "View" based.
|
Add Google API |
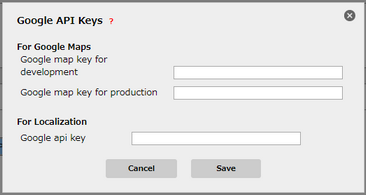
Opens an Overlay which allows user to enter Google API keys. For Google Maps, Google Maps API Key is used. For Localization Google API key is used.
|
Open Page Editor |
Opens the Page Editor window where user can add and manage pages of the application in the Page Editor.
|
Go to App Manager |
Opens the Application Manager window where user can manage their applications.
|
Note:
1.The user needs to provide the market details only once for each application. In case, if the user is adding another platform, the market details which user has set in the first platform will be auto fetched in the market page for the second platform. i.e. if the user provides market details in the market1, market2 and market3 pages for one platform the same data will be fetched in rest of the platforms as well.
2.The details provided in the page Market1, Market2 and Market 3 will be used while uploading the app in to the app store or play store. The user can redirect back to previous page on clicking on the back button on each page of the platform settings.
3.The user can cancel the platform settings process any time by clicking on the "Cancel" button. The cancel button will appear in each and every page of the platform settings.
Global Settings Page:
Step 1: Click on the Global setting icon as shown in figure.

Add Google API is used for adding Google APIs , Google Maps API or Google API Key for Localization.
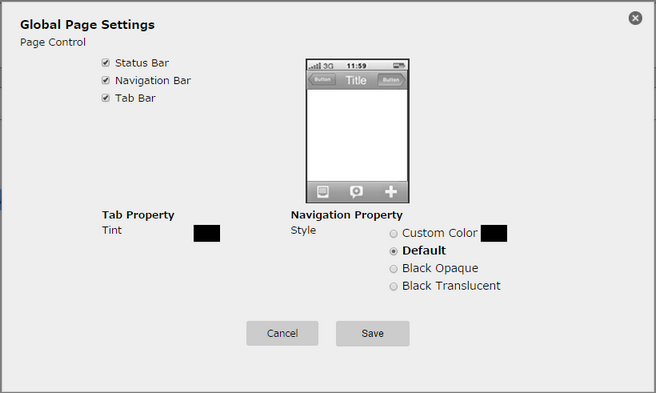
Step 2: Following window opens. Set up the "Global Page Settings". Click here to know about Page Control, Tab Property and Navigation Property.