Screens |
  
|
Screens |
|
This interface will allow the users to manage multiple screens of different resolutions. User can Add any custom resolution screen as per their requirement, Modify the properties of existing screens and Delete them by selecting particular screen from the list which are not required. It allows managing screens for any Phone or Tablet devices.
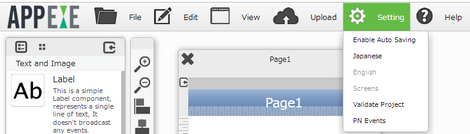
Step 1: Click on the Settings menu and select Screens from the drop down. The page should be closed to set the Screen settings.
Step 2: “Available screens” window appears. It displays the list of current screens. Click on “Add” to enter properties for new screen.
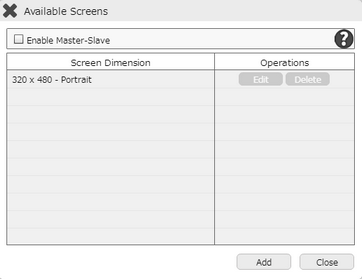
Note: The resolution shown here is the one selected in AppExe Console while creating the project. This can be set anytime at a later stage from Platform settings.
Also here, 320 represents Width, 480 represents Height & Portrait represents Orientation.
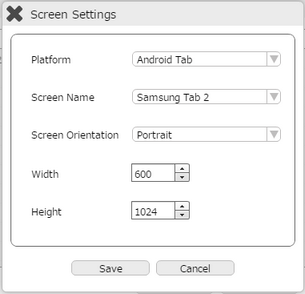
Step 3: Screen Settings Window Opens.

Step 4: Enter the resolution of the screen representing some device.
Property |
Description |
Platform |
Drop Down shows list of Platforms for e.g "Android Tab". |
Screen Name |
Provide the Screen Name here. |
Screen Orientation |
How screen should be laid, select from the list of options. Available options - Landscape or Portrait. |
Width |
Width of the screen/device |
Height |
Height of the screen/device. |
Click on the Save button to save the screen settings.
Click on the “Cancel” button to close the “Screen setting” window without saving the settings.
Step 5: Available Screens window appears in the list showing the entry for new resolution just created in the previous step.
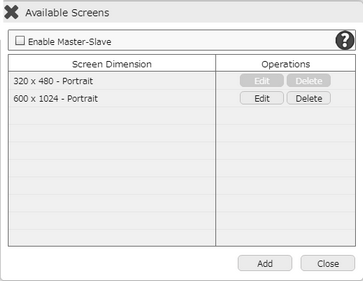
Operations available on Available Screens Window:-
Edit |
Click on the "Edit" button on the selected screen to edit the selected device screen resolution settings. |
Delete |
Click on the "Delete" button on the selected screen to delete the selected device screen resolution. |
Close |
Click on the “Close” button to close of the “Available screens” window. |
Enable Master-Slave |
User can select any one Screen as Master Screen. Click here to know more. |
For changing the current default screen resolution and applying this new screen created in above steps follow steps below:
Step 1: Open the new page using Page Selection Window, this opens the page of default resolution.
Click on the small "phone" image available on top right corner of the Page opened.
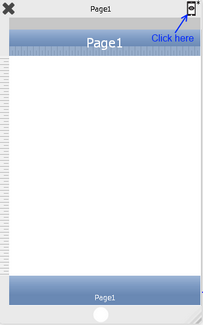
Step 2: This opens the new toggle window, displaying screen resolution of the default window.
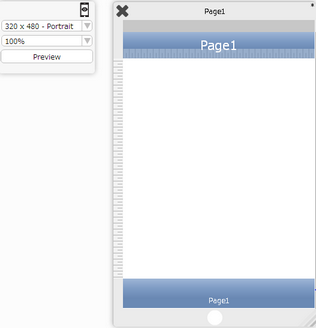
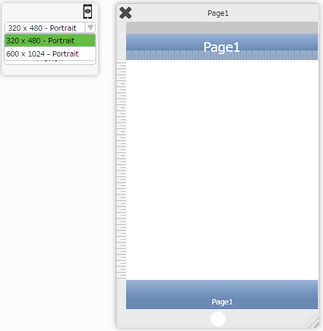
Step 3: Use the drop-down button next to this and look for the screen resolution created from "Available Screens" window. Select the new Resolution i.e (600 * 1024) from the Drop-down.
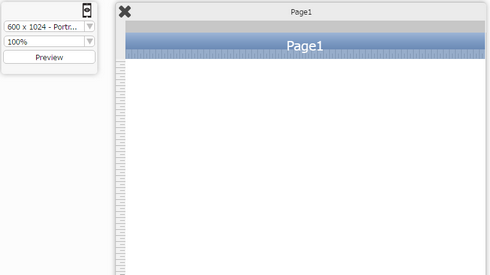
Step 4: The Page changes to new resolution selected.
Note:
1) If the devices resolution is not mentioned in the screens then it will open in Nearest resolution.
2) If user have two screens then the modification done on one screen will not impact on different screen.